How to Crochet
Posting patterns and tutorials do me no good if you don't know how to crochet or read a pattern. So without further ado, lets jump right in!
Stitch Abbreviations
When reading a pattern you are going to come across a lot of abbreviations. Below are the most common ones in any pattern. Lets learn the abbreviations now and later I will teach you how to make each one.
When reading a pattern you are going to come across a lot of abbreviations. Below are the most common ones in any pattern. Lets learn the abbreviations now and later I will teach you how to make each one.
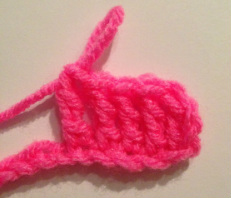
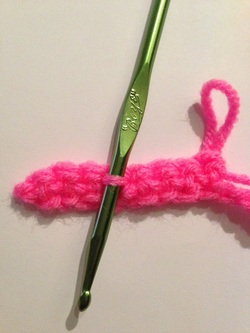
St= stitch. A stitch is anything worked. It can be a chain or a single crochet or even a front post double crochet (Don't get intimidated, we'll learn all of those later!) The stitches shown in this picture are of treble crochets

|
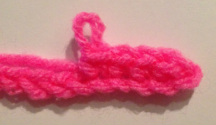
YO= Yarn Over. This is the act of taking the yarn and pulling it over the crochet hook
|
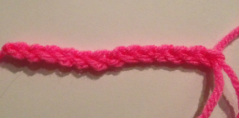
Ch= chain. A chain is a foundation. Many patterns that call for a straight edge (such as a pot holder or a square) will start out with a chain.
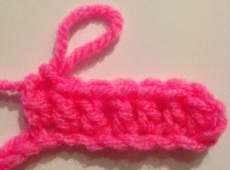
SC= single crochet. Single crochet is a very common stitch in which all other stitches are based off of
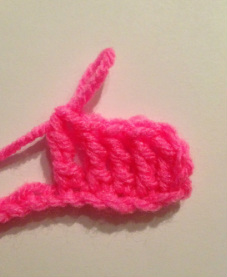
DC= Double crochet. This is one stitch with double the height of a SC (single crochet).
|
HDC= Half Double Crochet. A HDC is a stitch in between the height of a SC and a DC
|
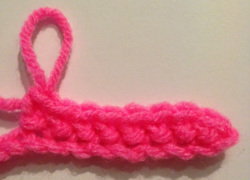
TRC= Treble Crochet or Triple Crochet. This stitch adds a lot of height to your work.
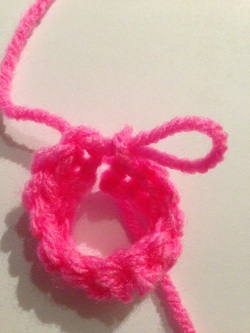
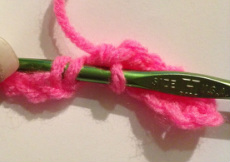
Sl St= Slip Stitch. This stitch is used to join stitches together without gaining height. It is used at the end of a round or at the end of a foundation chain. Its very hard to show a sl st in a picture because the stitches over lap in order to be joined together. In this picture I joined the stitches and then slightly pulled them apart to show the yarn joining the two.
FP= Front Post. There are three kinds of posts but only two have abbreviations. The front post, as stated in the name, is in the front of the stitch. This abbreviation will be seen preceeding another indicating what kind of stitch to perform. EX: FPSC = Front Post Single Crochet. That means insert your hook into the Front Post and then make a Single Crochet
BP= Back Post. Just the opposite of the FP, the back post is in the back of the stitch. This abbreviation will be seen preceeding another indicating what kind of stitch to perform. EX: BPSC = Back Post Single Crochet. That means insert your hook into the Back Post and then make a Single Crochet
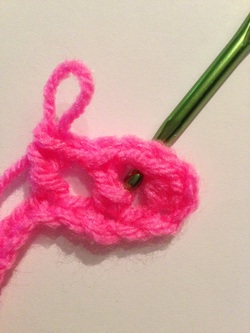
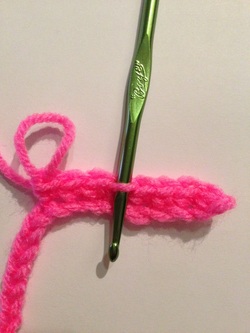
SP= Space. This refers to the space BETWEEN stitches or between the posts of the stitches. Where you see the crochet hook tip is the space. The posts are the things on the side of the spaces.
DEC= Decrease. This means that you need to draw up two stitches on the hook and only work one so as to decrease the number of stitches in a row or round.
Pattern Abbreviations
* to *= this area of the pattern is to be repeated as many times as specified
( )= just like in Math class, the pattern in parentheses is to be worked together
tog= together. Some patterns use "tog" as a way to decrease stitches. For example, you may see sc2tog, which means single crochet 2 stitches together .
FO= simply means to fasten off, or tie off, ending the use of that yarn.
Reading a Pattern
Above are the most common used abbreviations in a crochet pattern. Once you are familiar with them you will be able to read any pattern with ease. For example a pattern may read like this:
CH 30.
Row 1: Starting in second ch from hook, sc in each st across
This means, make a foundation chain with 30 chains. Then, for row 1, turn your work and starting in the second chain from the hook, single crochet in each chain all the way to the end of the foundation chain.
If the pattern calls for working "in the round" (such as for a doily or round pot holder) the pattern may read like this:
Round 1: Ch 2. Sc in 2nd ch from hook. 8 sc in same sp, join with sl st to first sc.
This means: make a foundation chain of 2 and in the first chain, make a single crochet. Then, in the same hole, make 8 more single crochets. When all 9 single crochets are complete, join the first single crochet to the single crochet with a slip stitch.
Here is a pattern I made up for a pot holder. In block parentheses is the translation of how to read it.
CH 30 [make a foundation chain with 30 stitches]
Row 1: DC in second ch from hook and in each st across. CH 2, turn [double crochet in the second foundation chain to the left of the hook. Then make a double crochet in each of the foundation chains all the way across to the end of the chain. Make 2 chains at the end of the row and turn your work so the back is now facing you]
Row 2: DC in each st across, ch 2, turn [work a double crochet in each stitch all the way across to the end of the row, then make two chains, and turn your work again]
Making sense yet? It probably won't sink in completely until you learn how to make the stitches in the pattern. So let's move on to that.
Learning to Tie On
The first thing you need to learn is how to get the yarn on the crochet hook. The easiest way to do this is to make a slip knot. Here's how:
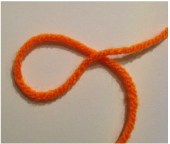
Fold the yarn over itself making a ring and leaving a tail on one end
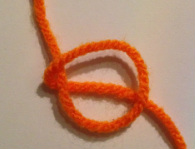
Now fold the ring over the yarn that is NOT the tail. It should be folded over the yarn that is attached to the skein
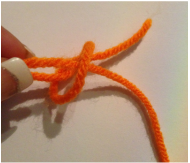
Pull the piece of yarn attached to the skein through the ring, creating another loop
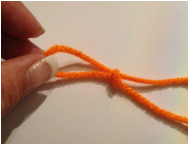
Gently pull the new loop until the slip knot is tighter but not so tight that you cant adjust the loop
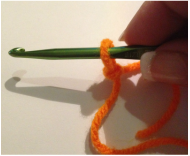
Put the loop on your crochet hook and pull til almost tight on the hook. The yarn loop should move easily up and down the hook. If it doesn't, loosen the loop.
You may want to practice this technique a few times because you will use it quite often. Every pattern that calls for a foundation chain will require you to use this technique.
Now that you have learned the abbreviations and how to tie on, visit the other pages listed under HOW TO CROCHET to start learning how to make stitches. Good luck and Happy Hooking!!!
